Effective Date: October 22, 2020
User Guide - Remote Deposit Capture (RDC)
User Guide
Remote Deposit Capture (RDC)
Effective Date: October 22, 2020
Step 1 - Application
Go to the app store and download the Continental Bank mobile app on any iOS or Android device. The application works the same on all devices, the only difference is the layout form fitting to screen sizes.
Step 2 - RECEIVEING YOUR SCANNER
A Continental Bank representative will provide the online password setup procedure and URL to you directly. Once that setup is complete with the Bank’s RDC vendor, Wausau, the RDC Scanner will be drop shipped directly to your designated location. Your specific URL and Password for RDC will be sent to your designated email, via secure email.
Step 3 - Pre-Scan Setup
Follow the instructions as outlined below and also in the RDC User Guide provided to you by Wausau.
Note: The RDC process and scanner needs to be completed using Internet Explorer. Please access that by searching on your computer or clicking on the Start Window/Windows Accessories/Internet Explorer.
Note: The RDC process and scanner needs to be completed using Internet Explorer. Please access that by searching on your computer or clicking on the Start Window/Windows Accessories/Internet Explorer.

Step 4 - ESTABLISH A TRUST TO THE WEB SERVER
The web remote capture client is designed to be run as a trusted site. The institution’s website must be part of a Trusted Sites zone in Internet Explorer on the client machine. Establish a trust to the web server so that Internet Explorer can verify the identity of the remote capture application and know that the program comes from a known, reliable source.
1. Open Internet Explorer.
2. Go to Tools / Internet Options (may have an icon only).
1. Open Internet Explorer.
2. Go to Tools / Internet Options (may have an icon only).

3. In the Internet Options window, select the Security tab.

4. Highlight Trusted Sites from the web content zones at the top.

5. Click “Sites”.

6. Enter the URL of the Remote Capture Web Server (provided earlier via secure e-mail) to which the client PC will connect.

7. Remote Capture uses HTTPS (server verification). Ensure to check the "Require server verification" box. If it is unchecked this will still not reduce the security of the RDC application.

8. Click on Add and put in the following URL: https://*.wausaud247.com. The URL will list at the bottom of the screen as a trusted site. Click on close to save the trusted site tab.

Step 3(c)
Once the photos are taken, click “Deposit”. Then a screen will appear with a green dialogue box indicating the check was transmitted successfully. The click “Go to Account Summary”.

Step 4 - VERIFY SETUP-UP (ActiveX Controls for Microsoft.NET)
To further enhance the security settings of the RDC app, enable the relevant ActiveX components.
1. While still in the Internet Options screen, click “Custom Level” for the Security Level
1. While still in the Internet Options screen, click “Custom Level” for the Security Level

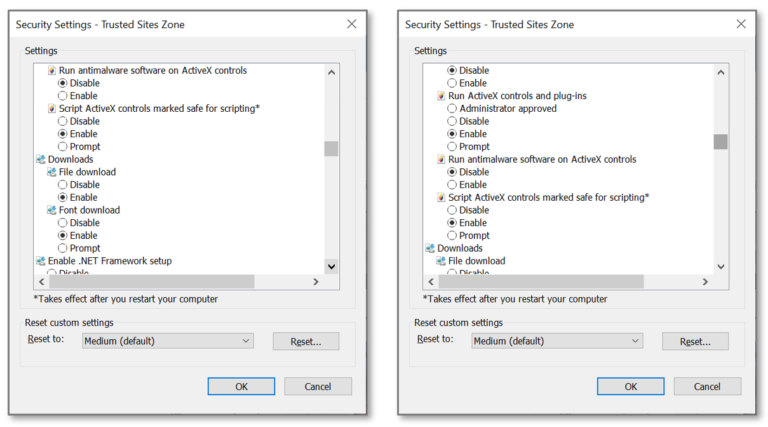
2. Ensure the Security Settings (Screenshots of these settings in the menu are shown below):
a. .NET Framework-reliant Components:
• Run components not signed with Authenticode – ENABLE
b. Enable .NET framework setup – ENABLE
c. ActiveX Controls and Plug-ins:
• Display video and animation on a web page that does not use an external media player – ENABLE
• Script ActiveX controls marked safe for scripting – ENABLE
• Run ActiveX controls and plug-ins – ENABLE
d. Miscellaneous
• Use Smartscreen filter – DISBALE (Smartscreen Filter, Windows SmartScreen or the Windows Defender SmartScreen are the same protection feature, with different names, defending on the Windows version that you are using.)
Screenshots of these settings in the menu:


3. Click OK to save your changes and close the window.

4. Select the “Advanced” tab (screenshots of the settings in the “Advanced” tab are below):
a. Under “Advanced” there is a “Security” section. See 2 screenshots on top of next page.
• Do not save encrypted Pages to disk – DISABLE
• NOTE: If this option is checked it can cause several problems on the system, including not running .NET controls and viewing PDFs could be affected.
• Integrated Windows Authentication – DISABLE
• Use SSL 2.0 – DISABLE
• Use SSL 3.0 – DISABLE


5. Select the “General” tab. Then, under the “Browsing History” section, click “Settings”.
a. Then on the screen to the right, click on the circle next to “Every time I visit this webpage” and hit “OK”.
a. Then on the screen to the right, click on the circle next to “Every time I visit this webpage” and hit “OK”.

Step 5 - SCANNER INSTALL
*You will need to be logged into the PC with an Administrator User Profile so you have rights to install the software.
1. Log into the Remote Deposit Capture site using the URL provided earlier in the secure email using the provided Username and Temporary Password.
1. Log into the Remote Deposit Capture site using the URL provided earlier in the secure email using the provided Username and Temporary Password.

2. Once logged in you will need to change your Temporary Password.

3. Once logged in, click on Installation from the menu on the left. In the Scanner Setup section, choose CAS Security Policy from the drop-down menu and install by following the prompts.

4. After the CAS Security Policy has been installed, continue and install the scanner driver. Choose your scanner from the drop-down menu and install by following the prompts after.

5. The following pop-up will appear and you will need to choose “Download and install this feature”.

6. A new pop up page will appear. Highlight “Panini Common Drivers” and click on “Next”.

7. Once complete you will receive a confirmation page. Click on “Finish”.

Step 6 - PROCESS TO SCAN CHECKS AND END OF DAY PROCESSING
1. To use the scanning software, please open Internet Explorer.

2. Open the URL from the communication with Wausau which was sent previously in the secure e-mail. Yours will be different from the one below.

3. Please input User ID and Password from the previously received secure e-mail. You will be asked to change your password during the first login.

4. There is one additional screen after the password screen, click “Continue”.

5. Opening screen for RDC.

6. Select “Capture Deposits”.

7. The next screen will show the entity. Input the total for the deposit and select “Create Deposit”.

8. The next screen will show that a deposit slip is needed at the beginning of the batch. Please make sure to have sufficient deposit slips.

9. With the scanner plugged in, place a deposit slip and checks into the scanner. Click the scanning button.

10. The scanned documents will appear on screen at the bottom. Documents with errors will appear above for checking/editing.

11. Clicking on items with errors may be the result of the system confirming legibility. Click ignore if the image appears okay.

12. (Optional) If you need to start over, select close and delete on the next screen. Go out and restart the process if necessary. You can also defer to log out and log in at a later time/date to finish the batch.

13. (Optional) Confirm deletion of the batch.

14. Once data fields are correct, a message that the deposit is balanced and ready to be closed will appear. If you are done, select close.

15. Select release on the next screen to release the batch.

16. This screen will open showing batches released and ready for transmission. Select transmit, the batch is now sent to Wausau for processing.

17. Final screen showing the batch in a transmitted state.

Banking Services
Cash Management
“Bottom line, you need funding from a bank that listens"
“They take the time to learn
about potential customers
and their particular industry.
It makes a huge difference…”
“The success of every vendor depends on a financing partner…”
“Their years of industry experience promulgate itself in the consistent professional and reliable service provided…”
Apply for financing today
We have a proven track record of working with our partners and customers in developing financing strategies that help them achieve their goals.